|
The field of photo and video editing has seen immense growth and development in recent years, with technology constantly advancing and providing new tools and techniques for editors to enhance their work. One such tool is Adobe Photoshop, a powerful software that is widely used in the industry for its versatile features and tools.
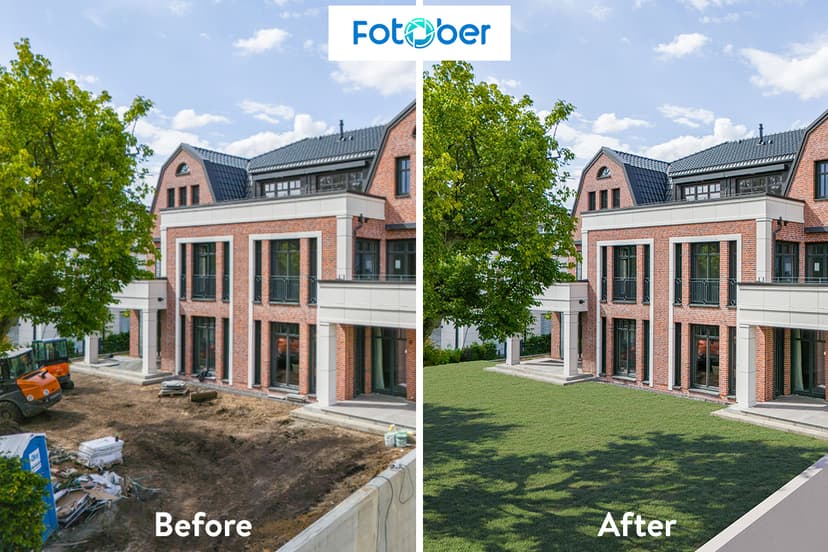
View Detailed Article At: how to add grass in photoshopIn this article, we will focus on one specific editing technique that is commonly used by photo and video editors - adding grass in Photoshop to create stunning field photos. Whether you are a beginner or an experienced editor, this guide will walk you through the steps of adding grass in Photoshop to elevate your field photos to the next level.
Xem Tai: Master the Art of Adding Realistic Grass in Photoshop!
 Why Add Grass in Photoshop?The addition of grass in Photoshop may seem like a minor detail, but it can make a significant difference in the overall look and feel of a field photo. Adding grass can add depth, texture, and realism to an otherwise flat and dull image. It can also enhance the composition of the photo, making it more visually appealing to the audience.
 Moreover, adding grass in Photoshop allows editors to have more control over the final result. They can choose the type of grass, its color, and placement, giving them the freedom to create the desired effect without any limitations. Step-by-Step Guide to Adding Grass in PhotoshopNow, let's dive into the step-by-step process of adding grass in Photoshop to your field photos: Step 1: Choose the Right PhotoThe first step is to choose the right photo to work with. Look for a field photo that has a clear and defined foreground, preferably with a flat surface. This will make it easier to add the grass and blend it seamlessly into the photo. Step 2: Create a New LayerOnce you have your photo selected, create a new layer by clicking on the "Create a New Layer" button at the bottom of the Layers panel. This new layer will be where we will add the grass elements. Step 3: Select the Brush ToolNext, select the Brush tool from the toolbar on the left or press the "B" key on your keyboard. Make sure to select a soft round brush with a medium to large size, depending on the size of your photo and the amount of grass you want to add. Step 4: Adjust the Brush SettingsBefore we start adding grass, we need to adjust the brush settings to make it look more realistic. Click on the "Brush Settings" icon on the top toolbar or press the "F5" key on your keyboard to open the Brush Settings panel. Here, you can adjust the size, hardness, and spacing of the brush to your liking. For the grass, we recommend setting the size to around 70-80 pixels, hardness to 0%, and spacing to 200%. However, feel free to experiment and adjust these settings based on your photo and personal preference. Step 5: Choose the Right ColorNow, it's time to choose the color of the grass. Click on the color swatch at the bottom of the toolbar or press the "D" key on your keyboard to set the default colors. Then, click on the color swatch again to open the Color Picker. Here, you can choose a shade of green that matches the grass in your photo or use the Eyedropper tool to sample a color directly from the photo. Step 6: Start Painting the GrassWith the brush settings and color selected, start painting the grass on the new layer you created earlier. Use short, quick strokes to mimic the appearance of grass blades. You can also vary the size and opacity of the brush to add more depth and variation to the grass. Remember to follow the natural flow of the grass in the photo and focus on the foreground first before moving on to the background. You can also use different shades of green to add more realism to the grass. Step 7: Add Texture to the GrassTo make the grass look more realistic, we need to add some texture to it. One way to do this is by using a grass brush, which can be downloaded for free from various online sources. Once you have downloaded the brush, load it into Photoshop by going to Edit > Presets > Preset Manager and clicking on the "Load" button. Then, select the grass brush from the Brush panel and adjust its settings to your liking. Use this brush to add texture to the grass by painting over it in a random pattern. Step 8: Blend the Grass into the PhotoNow that we have the grass elements in place, it's time to blend them into the photo to make it look more natural. To do this, adjust the opacity of the grass layer to around 80-90% and use the Eraser tool with a soft brush to erase any hard edges or areas where the grass looks too dense. You can also use the Blur tool to blur some areas of the grass to create depth and make it blend seamlessly into the photo. Step 9: Add Finishing TouchesLastly, add some finishing touches to the grass to make it look more realistic. You can do this by using the Dodge and Burn tools to add highlights and shadows, respectively, to the grass. You can also use the Hue/Saturation tool to adjust the color of the grass to your liking. Once you are satisfied with the result, merge all the layers by right-clicking on any layer and selecting "Merge Visible." This will merge all the layers into one, making it easier to edit and save the photo. ConclusionAdding grass in Photoshop is a simple yet effective technique that can take your field photos to the next level. By following the steps outlined in this guide, you can create stunning and realistic grass elements that will enhance the overall look and feel of your photo. Remember to experiment and play around with different brush settings, colors, and textures to achieve the desired effect. With practice and patience, you can master this technique and use it to elevate your photos to a whole new level. We hope this article has been helpful in guiding you through the process of adding grass in Photoshop. So, go ahead and give it a try on your next field photo and see the difference it can make! Fotober is a brand that is dedicated to providing top-notch services to customers worldwide. Our mission is to deliver fast and expertly edited images at an affordable price, while also helping our clients grow their businesses. With a strong commitment to excellence, Fotober is the go-to brand for all your photography needs.
#how_to_add_grass_in_photoshop, #howtoaddgrassinphotoshop, #Fotober, #Fotober, #Fotober
|